Make Something New Every Day


This blog is inspired by all those who love to cook, whether experienced or not, and who continue to experiment with new ideas & ingredients, and best of all, share their passion with others.

The first entries are recipes prepared by the students of Lionel Wilson College Preparatory Academy in Oakland, CA. Fifteen students with varying cooking experience participated in my weekly workshop (via Tutorpedia), and successfully prepared various meals, snacks, and baked goods as part of an after-school program.

Along with the recipes from that class, I will continue to add new seasonal items, spanning every genre of the culinary world, as well as a helpful list of links to recipes, instructional videos, and places to shop and volunteer in your area.

Feel free to ask me questions and share your recipes and ideas as well. I look forward to cooking with you.


August 20, 2018

Soft & Chewy Chocolate Chip Cookies

Who can resist freshly-baked chocolate chip cookies? There are probably thousands of recipes out there, and I have a few myself, but this latest version shared by a friend (thanks, Jeffrey!) is my current favorite. I believe the difference is dissolving the baking soda in hot water and adding it directly to the dough before stirring in the dry ingredients. The result is a soft, chewy texture, and depending on how long you bake them, a crispy edge.

Recipe
3C unbleached all-purpose flour
1/2t kosher salt

2t baking soda
2t hot water

1C (2 sticks) unsalted butter at room temp (softened but not melty)
1C sugar
1C light brown sugar
2t vanilla extract
2 eggs

2C chocolate chip or chunks 

Cream the butter until light & fluffy. Beat in the white sugar. Then the brown sugar. Scrape down the sides of the bowl often to make sure everything is incorporated. Beat in the eggs one at a time. Stir in the vanilla. Disolve the baking soda in hot water and stir into the dough.Stir in the flour until just incorporated. Stir in the chips.

Preheat oven to 350'. Line baking sheets with parchment. Use a 1.5" wide retractable scooper (or a spoon) to drop evenly-sized balls of dough on the sheet pan. I get 12 cookies on a standard 1/2-sheet pan. 

Bake until desired doneness (about 10-12 minutes). Cool on a rack. Store in an airtight container for up to one week. Makes about 40. 


                                             на здоровья!


August 3, 2018

Coconut Cake

It's so simple. And unless you hate coconut, a guaranteed crowdpleaser (even the vegans won't be able to resist). No expert skills needed for this one. A cake that's about as easy as a mix, whipped cream, and coconut. That's it. 

The photo is of an enormous 10" cake I made for my dear friend's baby shower. (I also made a tiny little 6" cake for the baby. IKR?) The recipe below is flexible and can fill 2 10x3 or 3 9x2 pans. You can split the 10" cakes in half to make 4 layers like I did, or stack the 3 9" layers (or split them to make an eye-popping 6-layer cake.) The batter will be a bit runny, and baking times can vary. I recommend wrapping the pans with soaked bake-even cake strips to help keep the sides from getting too dry. You can also trim away the sides after baking for a moister cake and nicer presentation. 

Don't be alarmed. I've included a lot of tips, but if you read through this a couple times, and have all your ingredients & tools laid out ahead, you'll do fine. Ready to make it? 

Tips: This cake can be baked up to two days ahead. Wrap the cakes well and store in the fridge. This cake can be assembled up to two hours before serving. Store uncovered in fridge. The chilled cake can be extra refreshing on a hot day. This cake can be filled with lemon curd or layered with berries. It's very versatile.

Preheat oven to 350'

Prep Your Pans (crucial)
Set each pan over a sheet of parchment and trace around the bottom of the pan with a pencil. Cut out the circle just inside your tracing line. Butter & flour the pans. I take a stick of butter and run it along the sides and bottom to coat well, then get in there with my fingers to evenly rub the butter into every nook & cranny. Then dump in about 1/4C of flour & tilt the pan around while tapping the bottom & sides so the flour coats evenly. Then knock the remainder of the flour out so you don't have clumps. Lay in the parchment round. 


Bake-Even Strips
If you bake a lot of cakes, these are a nice inexpensive investment that raises your game. Soak the strips for about 10 minutes, then squeeze out the excess water, and wrap around the outside of the pan, securing with the pin provided. The strips will help prevent overbrowning & dry sides. This cake has a lot of eggs, which can brown very quickly. When baking, you'll see that the top of the cake will get very golden brown long before the center is set. Don't panic. This is normal, and the top will end up kind of sticky anyway. If you don't have the strips, you can trim away the sides if they get too dark or dry, or leave them be. If you frost the cake with the whipped cream an hour or two ahead of serving and keep it in the fridge, the sides will soften up nicely. In fact, this whole cake gets moister the longer it sits in the fridge. Next-day slices are absolute heaven. 


Recipe
4C unbleached all-purpose flour
2t baking powder (always make sure it's fresh)
1/4t kosher salt
2C milk (you can use whole or lowfat)
12T unsalted butter (1.5 sticks)
8 eggs (I always use XL) 
4C sugar
2t vanilla extract (for the love of god, use the real stuff)
1/4t almond extract (optional)

4C (2 pints or a quart) of heavy whipping cream
1/2C confectioners sugar
1t vanilla extract

About 2-3C shredded coconut (the weird sugared kind works best). I say 2-3C because you can use a little or as much as you want. You can layer it inside and cover the whole cake, or just cover the top and a little down the sides...it's not a science. 
baking powder costs about $2. don't risk it. buy a fresh can & date it. dump it after 6 months.
Make the Batter
  1. You don't have to, but sifting the flour helps with your overall success. Whisk in the baking powder & salt. 
  2. Melt the butter into the milk (I do this in the microwave for about a minute+. 
  3. Beat the eggs & sugar for about 5 minutes until thick and pale. 
  4. Stir in the extracts. 
  5. Fold in the flour, making sure you get it all incorporated. 
  6. Stir in the butter & milk. 

Divide the batter evenly among the pans. Tap each pan a few times on the counter to pop any large air bubbles. 

Baking times will vary depending on the size of the pans and your oven. 10" rounds can take 45 minutes. If you're using 9x2" pans, start checking after about 20 minutes. If your oven has a hot spot (like mine), rotate the pans carefully for the last 10 minutes of baking. 

Signs of doneness: 
  • touch the top and the dough springs back
  • toothpick or skewer comes out with no raw batter
  • sides of cake start pulling away from the pan
Cool the cakes on wire racks for about 5 minutes, then invert the pans an release the cakes. If you prepped your pans well, they should slide right out. If the sides are stuck, run a thin knife along the sides, then release the cakes. 


Whip it Good
Keeping the cream in the fridge until right before you whip it will help speed up the process. You can also chill the metal bowl and beaters. Start on med-low so the cream doesn't splatter all over. 

Assembly
If you want a 4-tier cake, use a long, thin, sharp knife to carefully cut the cakes in half. Start by scoring the sides of the cake evenly, then join the cuts, then cut all the way through. Lay each layer out on your work surface. Place the bottom on your platter or base or lazy-suzan. Cover with whipped cream all the way to the sides. Sprinkle on some coconut. Stack on the next layer. Repeat. Once the layers are all stacked, coat the whole cake generously with whipped cream, and cover with coconut. It. Will. Get. Messy. 

Either serve immediately, or chill in the fridge uncovered for up to two hours. 


на здоровья!

June 20, 2018

I Can't Believe They're Gluten-Free Carrot Pineapple Coconut Muffins


It all started with a juicer. I bought a masticating juicer a couple years ago, and though it is quite efficient and I love the juice, I felt bad about all the pulp waste. Raised with a "waste not, want not" attitude, I set about finding ways to use the pulp. It can be frozen and added to veggie burgers, meatloaf, baked mac & cheese, and yes, baked goods. 

Issue #2. Half my friends don't eat wheat. I like to feed my friends. So I buy and try several types of GF flours, and in general, settle on Bob's mix that doesn't contain chick pea flour (I don't like the aftertaste). In this recipe, it replaces wheat flour 1:1, so if you prefer wheat flour, go ahead and use it. In general, this type of bread is very forgiving. For example, I was out of granulated sugar, so I used 1C of confectioners sugar and 1C of light brown sugar, and they turned out great! 

You can bake this as a 10" bundt cake or as about 17 muffins. 

Line muffin tins with liners, or grease & flour a 10" bundt pan. Since the batter needs to rest about 30 minutes, you can preheat the oven to 350' once the batter is mixed to save energy.

Recipe
4C fruit/veggie (in this case it's grated carrots & small-dice pineapple, but you can use grated apple, or zucchini, or whatever)
2 eggs (I always use XL)

1/2C coconut oil (or you can use grapeseed or canola)
1C packed light brown sugar
1t vanilla extract

2C Bob's GF flour mix
1C confectioners sugar
1/2C shredded coconut
2t sifted baking soda
1/2t kosher salt
2t ground cinnamon
1/2t ground cardamom
1/2t ground cloves 

Lightly beat the eggs & combine well with the 4C fruit. Melt the coconut oil & stir in the brown sugar & vanilla extract. Stir the sugar/oil into the carrot mixture.  Combine all dry ingredients. Fold the wet into the dry & let it rest at room temp for about 30 minutes. Meanwhile, preheat your oven and prep your pans. 
Muffin on left had a better rise & texture because it was baked after the batter rested for 30 minutes. 

For muffins, I use a 2" wide retractable scoop for even measuring & fast scooping, but you can use a large spoon to fill the tins. 

Bake muffins for about 20-25 minutes. If your oven has a hot corner like mine does, turn the pan carefully after about 15 minutes. The muffins are done when you can gently push on the top with a finger and the dough springs back. Darker tins will bake faster, so keep an eye out. 

A bundt cake may take 45-55 minutes. You can also use the "finger" test, as this cake is quite oily, so using a skewer may not give you an accurate reading. The cake should be pulling away from the sides of the pan, and spring back when you gently push on the doughiest part with your finger. 

Allow the cake or muffins to cool in the pan for about 5 minutes, then turn out onto a cooling rack to cool completely. If you cut a warm cake the structure will turn to glue. Better to wait. It will also be much easier to cut. 

GF baked goods especially tend to get moister as time goes by, so better to eat them within a day or two. Store cooled cakes in airtight containers or bags. 


на здоровья! 


April 1, 2018

Nikuman (Steamed Pork Buns) 肉まん

I love food. Sure, I can go out and buy dumplings. But my joy is exponentially magnified when I make my favorite foods, and share them with loved ones. So here we are. 

How is it possible then, that this was my first experience making a steamed dumpling dough? The fact remains, and I owe my thanks to my pregnant and insatiably hungry Japanese friend for inviting me over to make these on a rainy spring afternoon. 

We followed the recipe and technique illustrated clearly by Nami of Just One Cookbook (a blog I've come to revere and resource often for Japanese cookery), and were pleasantly surprised at how simple both the dough and filling were to prepare. I say "simple" because I believed none of the 1,000 steps needed to prepare these were particularly difficult. It just requires vigilant organization, and some basic cooking skills. Also helps to have the right tools. Read through Nami's blog to make sure you have what you need. 

I vow to keep making (and eating) these until my crimping improves. Work, work, work. 

Note: Before you embark on this adventure, make sure you have a large bamboo steamer that fits atop a large pot. If the steamer hangs over the edge of the pot, it can burn. Wetting the steamer can help prevent catching. 

The Dough
10.6 oz all-purpose flour (10.6 oz = 300 g) (and more for dusting) 
2 scant T granulated sugar (scant 2 Tbsp = 20 g) 
½t Kosher salt
1t baking powder
1t instant dry yeast
1T neutral flavor oil (vegetable, canola, etc)
160-170 ml water (160-170 ml = 160-170 g)


The Filling
2 dried shiitake mushrooms
½C water
1 green onion, minced
4 leaves cabbage (4 leaves = 180 g), finely chopped
1t Kosher salt
¾ lb ground pork (¾ lb = 340 g)
1 inch ginger (1" =2.5 cm or 15 g)
1t granulated sugar
1T sake

The dough is super easy. Just combine everything but the water in a bowl, then stir in the water to form a craggy ball. Turn the ball out onto a clean, lightly floured work surface, and knead it for 10 minutes. This dough is a joy to knead. It requires very little dusting flour, and results in a glossy smooth beautiful ball. 
Place the ball of dough in a lightly oiled bowl, cover with plastic wrap, and allow to rise til double in bulk (about an hour). 

Meanwhile, make the filling. First, soak the mushrooms for about 15 minutes. Weigh them down with something to make sure they're submerged in the water. Remove the tough stems, and very finely chop the caps. 

Sprinkle the chopped cabbage with 1t salt to draw out excess water, then squeeze out the water, and combine the cabbage with the green onion, mushrooms, ground pork, and other filling ingredients. 

Assembling the Dumplings
Here's where I refer you to Nami's blog for detailed instructions. Read through it a couple of times, especially her tips on shaping the dumplings. Til then, organization is your friend. 

Cut 3" squares of parchment and lay them out on baking sheets. You will place each dumpling on one square as you shape them, then steam the dumplings on the parchment. 

Once the dough has doubled in size, dust the working surface with flour and divide the dough in half and then roll each piece of dough into a log. Cut each log into 5 even pieces and then cut each piece in half. Form each piece of dough into a ball and dust the dough balls with flour to avoid sticking to each other. Space each ball apart and cover loosely with damp kitchen cloth to avoid drying out. Let them rest for 10 minutes. 
Take a ball of dough and flatten it with your palm. Then roll it with a rolling pin into a round sheet. Here’s how I roll the dough. Hold the top of dough with left hand and use a rolling pin to roll out the dough with right hand. You only need to roll up and down on bottom half of the dough. After rolling 1-2 times, rotate the dough about 30 degree with left hand. Repeat this process until the dough becomes thin. The center of dough should be thicker than the edge.
Nikuman 13
photos from Just One Cookbook
Scoop 1½T of filling (with a 1½T cookie scoop or spoon) and place in the center of the dough.

Hold the dough with the left hand and seal the bun using the right index finger and thumb. First, pick up a corner of the dough with your right index finger and thumb and pinch together. Without moving your thumb, use your right index finger to pick up the dough and pinch it with your thumb while rotating the dough clockwise with your left hand.

Repeat this process about 10-12 times (=10-12 pleats) until you seal the last part of dough by pinching it tightly. Here are some tips: your left thumb should hold down the filling and use your left fingers to turn around the wrapper. Use your left index finger to help pleating. Also, lift up the pinched pleats slightly while you make the new pleat so the filling stays inside the dough.
Once you finish sealing the last part of dough, twist the pleats further with your right index finger and thumb to maintain a tight seal. If you’re left handed, reverse the directions.
Nikuman 17
photo from Just One Cookbook
Place the bun on a piece of parchment paper that fits the bun (for small size, 3” x 3”). Cover the finished buns with plastic wrap and repeat this process with the rest of dough. Let the buns rest for 20 minutes.
don't worry about imperfect crimping. it'll be delicious either way!

Bring water to boil and place the steamer on top of the pot. Once the water is boiling, place the buns (with the parchment) in the steamer tray leaving about 2” between each bun (buns will get larger while being steamed). Close the lid and steam over high heat for about 12 minutes. 

Serve immediately with your favorite dipping sauce. We drizzled a mixture of soy sauce, vinegar, and garlic sauce over them. Pure crack. 

いただきます!

Mushroom Piroshki Appetizers

Umami. Flavor that hits on all six cylinders. Mushrooms have it. And until a few years ago, I admit that my misunderstanding of mushrooms led me to dislike and avoid them. Thank goodness I've moved past that, because YUM. 

With a few simple steps, even common brown mushrooms can deliver powerhouse flavor, and in this case, kick the butt of the beef piroshki I made to accompany these mushroom ones for Easter. 

Mushroom 101

  • Selecting Fresh Mushrooms: How can you tell? See the photo above? Fresh mushrooms will have a smooth, glossy cap, that (for the most part) will not have come away from the stem. Like all produce, use it ASAP for the best results. 
  • Storing - A Cool Dark Place: Store in a paper bag in a low-humidity drawer in the fridge.
  • Washing: YES. Wash off the dirt, for they grow in the ground. Just rinse them under some cool water, and gently rub off any dirt. Allow them to dry, then use them as desired. 

Makes about 50 bite-sized piroshki 

The Dough
4oz cream cheese (just half of a regular old brick), at room temp
4 oz (1 stick) unsalted butter, at room temp
1 1/4C AP flour
1/2t kosher salt

Cream the butter til smooth. Add the cream cheese, and cream til combined. Stir in the flour and salt to form a ball. Flatten it out into a rectangular slab about 1/2" thick, wrap in parchment or plastic wrap, and chill for about an hour. 

The Filling
3 8oz packages organic brown mushrooms 
1 small, or 1/2 large white or yellow onion
2T olive oil
1T butter
salt & pepper 
sherry (optional)

1 beaten egg to seal the piroshki, and for an eggwash

For this recipe, we'll use the whole mushroom. Trim off the ends of the stems. If you have a food processor, you're very happy right now. Chop the shrooms in batches of 3 on "pulse" til finely diced. Otherwise, grab a sharp knife and go to town. Finely dice the onion. Heat a large skillet on medium-high, heat 2T olive oil, then saute the onion til golden. Remove from the pan. Turn heat to high. 

Dump the chopped mushrooms into a cheesecloth or clean kitchen towel (it will turn brown) and squeeze out as much liquid as you can, saving it in a jar for later use (I froze mine to use later in a soup or sauce). Dump the mushrooms into the hot pan, and saute, stirring constantly for even browning. Sprinkle with about 1/2t salt and freshly ground pepper. Saute for about 10 minutes. If you have some sherry, drizzle about 2T over the shrooms to deglaze the pan (about 1 minute). Add the shrooms to the sauteed onions, dot with butter, and allow to cool, stirring occasionally to let off steam. Taste the cooled filling. Add more salt & pepper if needed. 

Roll the Dough
Dust a clean work surface lightly with flour. This dough isn't very sticky, so you only need a little flour to help roll out your dough to about 1/16." Cut silver dollar-sized discs and place them on a parchment-lined baking sheet. 
My dough cutter is 2" in diameter 

Fill and Shape
Take a disc of dough and using your finger, brush some beaten egg around the inside edge. Scoop a full spoon of filling onto the center. Fold the disc in half like a taco. Press the edges together, then crimp the edge to further seal it. 

If making ahead, freeze the piroshki on the sheet pan, then transfer to a freezer-safe bag. 
unbaked frozen piroshki. space them out farther when baking.

Baking
Preheat oven to 400'. Space out piroshki on a parchment-lined sheet pan. Brush with eggwash, and bake until golden brown. Serve hot. 
my test bake popped open, so I added some eggwash to the seal. either way, they're delicious!


на здоровья! 

February 24, 2018

Lemony Scones

Let's cut to the chase. These scones are tender and delicious. With zest in the dough, and a tart lemon juice glaze on top, even the gluten-free people in your life will throw caution to the wind and gobble some down. This recipe makes a pretty big batch (I filled two sheet pans with about 30 4-bite scones each). Either make half the recipe, or keep it whole to feed a crowd, or freeze half unbaked for next time*. 

Recipe
4C AP flour
1/4C sugar
1T baking powder (make sure it's fresh!)
1t kosher salt
1/2t cream of tartar 
zest of a large lemon (save the juice for the glaze)

1 stick + 5T unsalted cold butter, cut into small cubes

1C + 6T half & half
1 large egg

powdered sugar & lemon juice for the glaze

Preparation
Preheat the oven to 375'

Using a food processor fitted with a metal blade (or a pastry cutter in a bowl), cut the butter into the dry ingredients until you see some pea-sized pieces, and some course-meal-looking pieces of butter in the flour. These uneven pieces of butter will give you the tender layers you want in a scone or biscuit. DO NOT OVERMIX. 

Whisk the egg into the half & half, then mix into the flour, just until a ball forms. I do this by hand. Then turn the dough out onto a lightly floured work surface, and gently knead the dough for just a few turns until all the dry bits are incorporated. Roll the dough into a rectangle about 1" thick. Using a pizza cutter or thin, sharp knife or bench scraper, cut the dough into squares, then cut the squares in half to make triangles. Clean, sharp cuts will help the sides of the scones puff up while baking. 

Space the scones out a bit on baking sheets lined with parchment, and bake about 20-25 minutes, until the tops just begin to turn golden. 

Allow to cool for about 10 minutes, then glaze. If you glaze when the scones are too hot, the glaze will melt right off, like that guy's face in Raiders of the Lost Ark. If you wait til they're too cool, the glaze won't dry properly. 10 minutes is perfect. 

Glaze
Sift about 1.5C of powdered sugar into a glass or ceramic bowl. Do not use metal, or it will react with the lemon juice, and the glaze will taste like metal. Squeeze a little lemon juice over, and stir (again, with something NOT METAL). Add lemon juice until you get a thick but still sort of runny glaze. It should coat the back of a spoon, but still drip...slowly. 

Serve immediately. 

*Note: If you decide to make the full batch and freeze half of them for later, freeze the scones on a sheet pan, then transfer them to a freezer-safe bag or container for up to 1 month. Bake from frozen. They might just take a bit longer to bake. 

На здоровя!

January 15, 2018

The Best Veggie Gyoza

Why make your own gyoza, when Trader Joe's sells bags of them for just a few bucks? 

Try them, and you will never again accept lousy store-bought substitutes. These are 1,000x better, and truly easy to make. I know I say that about some things, and people stare at me like "you're a freaking trained chef", but really, your kids could make these. 

If you really needed to, you could probably get all the ingredients at Safeway. 

The filling is super basic:
napa cabbage, 1 medium
carrots, 2 medium 
fresh shiitake mushrooms, 8oz. (crimini will do in a pinch, but don't have nearly as good a flavor)
green onion 

The wrappers are relatively interchangeable. You want a very thin, square or round fresh wheat-based Asian wrapper. Most grocery stores (in the Bay Area anyway) now carry at least one type of wrapper in the fresh/fridge case (try near the produce section at Safeway). Whole Foods has more than one kind (they have a cold case near the eggs with Asian noodles, etc.), and Asian specialty stores will have a bigger selection. If you like to cook Asian meals, I recommend going to an Asian specialty store and stocking up on some condiments. Fun! A basic traditional dipping sauce for these would be equal parts of soy sauce and rice vinegar. I always thin that out with some water (even if I start with reduced-sodium soy sauce). No one needs that much sodium, and you won't know the difference. 

Prep the Filling
Shiitake mushrooms have thick, meaty caps, and tougher stems. I generally use just the caps, and dry or freeze the stems for another use (like fortifying broths). Contrary to popular belief, you should always rinse mushrooms before using. They grow in the ground, you know. Just run them under some cool water, and use your fingers to gently rub off any dirt. Shiitake are very sturdy, and can take the abuse. Slice the caps in half across their width, then stack them back together like a hamburger; then slice thin slices. This way you'll have thinner strips, and more of them dispersed in your filling.

Remove the outermost leaves of the cabbage. Slice the cabbage in half lengthwise. Use a knife to slice very thin shreds down to the base (like you're shredding cabbage for coleslaw). 

Wash, peel and grate the carrots. 

Rinse and thinly slice two green onions. 

Heat a large skillet (I use a 12" for this) on med-high. Add 2T olive oil. Add the mushrooms, and saute for 3-4 minutes, until brown. Remove from the pan. Add the carrots, and saute for a few minutes until they're heated through and dry. Add the cabbage. Saute for just a few minutes until the cabbage wilts down. Remember, this filling will cook again when you cook the gyoza, so better to leave the veggies tender for now so they don't end up mushy. Stir in the green onion and mushrooms, and dump the filling into a large bowl to cool. Stir it occasionally to help steam escape so it cools faster. 

Assembly
Set out some baking sheets or large trays. Pour a little cold water into a small bowl (you'll use this to seal the wrapper). Put one some good music, or Mad Men, or whatever, and start wrapping. 

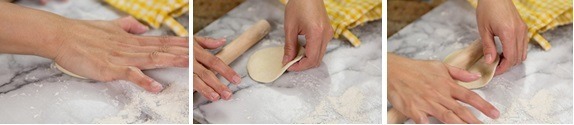
Using a fork, fill each wrapper with enough filling to cover about 1/4-1/3 of its area, leaving the edges free. Dip your finger in the water, and rub it around the edge of the wrapper. Fold the wrapper in half like a taco, and pinch the seam together firmly, going back over it a couple of times. Set the gyoza on the sheet, and keep that factory cranking. 
These are round wrappers. You can crimp the edge for a fancy effect.
With square wrappers, you can just seal them in half.

If you're going to eat tonight, wipe out the pan you used for the veggies, and heat it to medium. Add 1T olive oil and 1t toasted sesame oil (optional, but DO IT). When the oil is hot, place the gyoza seam-side up in a spiral formation, so they help each other stand up (and you can also get more in the pan that way). Brown the bottoms, then add about 1/2C water to the pan, cover, and reduce the heat to low. When all the water is evaporated, remove the lid, turn up the heat for a minute until they sizzle. Serve immediately with your favorite dipping sauce.

Freeze remaining gyoza on the sheet pan, then once frozen, transfer to a ziploc bag, and store for up to 3 months. 

いただきます!

Chocolate Almond Macaroons GF

My Mom discovered the recipe for these a long time ago, in a galaxy far, far away, and made them every year for Christmas. It was a BIG production. For the almond macaroon, we'd shell almonds, blanch them to remove the skins, dry them, and grind them to make the almond meal. The last few years, Mom was taking care of her Mom, and didn't have the bandwidth to make these. This year, I was fortunate to have a lot of time off around the holidays, so I volunteered to make them. And guess what? You can BUY organic ground almond meal at most stores with bulk sections. So that simplified things quite a bit to start. The rest may seem complicated or fancy, but most of these steps can be done ahead of time, allowing you to relax and enjoy time with your guests, while wowing them with these irresistibly delicious treats. 

If you make these ahead (which I recommend), do all the steps in one day, and freeze the macaroons, defrosting them about 20-30 minutes before serving (they're also really good frozen). As with any seemingly intimidating recipe, you have a greater chance of succeeding if you read through the recipe a few times first, and organize all your ingredients and tools ahead of time, visualizing each step. 

These (gluten-free!) macaroons have 3 components:
almond macaroon 
cocoa buttercream
dark chocolate coating

Let's start with the buttercream. I like the Neoclassic Buttercream recipe from the Cake Bible, as you don't need a thermometer for the sugar syrup, and it's a relatively quick and simple technique. We modified this recipe to use 3 egg yolks, so you don't waste any eggs, as the macaroon uses 3 whites. 

Before you start, make sure your butter is softened, but not melty. Here's what you'll need:

Cocoa Buttercream
3 egg yolks (I always use extra-large cage-free eggs)
1/4C + 2T sugar (only use white granulated sugar)
1/4C light corn syrup (you can find non-GMO at Whole Foods, etc.)
3/4C unsalted butter, softened (1 1/2 sticks)
3T cocoa powder, sifted 

Tools

  • Hand or stand mixer (I prefer a hand mixer for this small batch). 
  • Small sauce pan, preferably nonstick
  • Measuring cups, spoons 
  • Two small/medium mixing bowls, about the same size 
  • Tray of ice cubes (optional)

Method
Beat the yolks on medium-high until pale yellow and thick (about 5 minutes). 
Heat the sugar and corn syrup in the saucepan, stirring constantly with a wooden spoon or heat-proof silicone spatula, until the mixture comes to a roaring boil with large bubbles on the surface. 

With the mixer on low, VERY CAREFULLY pour the syrup in a thin stream into the egg yolks. 
AVOID pouring the syrup into the mixing blades, or the syrup will splatter on the sides of the bowl, harden, and you'll end up with crunchy bits in your smooth buttercream. Not the end of the world, but avoid it if possible. Start with a little syrup at first to temper the eggs so they don't scramble from the heat. Then continue quickly but carefully to pour in the rest of the syrup while beating on slow-medium. At this point you'll need to keep beating the mixutre for about 10 minutes until it cools to room temperature. You can speed up the cooling process by nesting the bowl in another bowl full of ice. Just keep moving that mixer around to make sure you're cooling the mixture evenly. Test the temperature by putting a dab on your lip. If it feels a bit cooler than your body temp, you can start adding the butter, 1T at a time, making sure it's completely mixed in before adding the next lump. Continue until all the butter is incorportated. 

Sift the cocoa powder over the buttercream, and mix in on low. You did it! Now you can set the buttercream aside while you make the macaroons. 
Preheat the oven to 375'.

Macaroons
3 egg whites
1.5C ground almond meal
1.5C powdered sugar, sifted

Tools

  • Stand mixer fitted with whip (or hand mixer). If you're using the same mixer as you did for the buttercream, be sure to wash it thoroughly with soap and hot water. Any oils left on the bowl or beaters can prevent your whites from firming up. You can also just make the macaroons first, and the buttercream second. 
  • Pastry bag (or gallon ziploc bag) fitted with a coupler (or you can use a teaspoon).
  • Baking sheets
  • Parchment sheets

Sift the powdered sugar into a large bowl. Whisk in the almond meal until there are no lumps. 
Beat the egg whites until stiff, wet peaks form (just until the peak holds). 
Fold in the almond sugar mixture 1/3 at a time. 


Immediately pour the batter unto your pastry bag. I use a binder clip to keep the batter from running out until I'm ready to pipe. If you're using teaspoons, line your baking sheets with parchment, and start dropping teaspoons of batter about 1" apart. 

Bake at 375' until deeply golden. Depending on your oven, you might want to turn the sheet around halfway through for even baking (my old oven has a hot corner).  You want the cookies good & golden because they are about to encounter a lot of moisture, and need that crunch to stand up to it. Ovens vary, but each batch should take about 15-18 minutes. Cool the cookies on cooling racks. Then gently peel each cookie from the parchment, and flip it over so the flat side is facing up. 

Assembly
Using a teaspoon, spread a mound of buttercream on each cookie, leaving a smooth-ish surface. Once all the cookies are all coated, freeze them for about 30 minutes. This way the buttercream won't melt into the chocolate when you're dipping them. 

Melt about 5oz finely chopped dark chocolate in a double boiler, or as I do, boil a couple inches of water in a sauce pan, and set the bowl of chocolate over it to melt. The water should not touch the bottom of the bowl. The steam will gently melt the chocolate, but DON'T LET ANY WATER GET INTO THE CHOCOLATE. It will seize up and harden. (If that happens, you can add 1T of honey to help remelt it.)

Once the chocolate is melted, remove the bowl from the heat, and set it on the counter next to your macaroons. Now, dip away! Hold onto the sides of the macaroon, dip it into the chocolate, then lift it up, bounce it on the surface of the chocolate, and shake of the excess. Set the dipped macaroons back on the sheet with parchment. Once they're all dipped, but them back in the freezer. Store macaroons for up to a month in an airtight container. 


Христос рождается!