
How is it possible then, that this was my first experience making a steamed dumpling dough? The fact remains, and I owe my thanks to my pregnant and insatiably hungry Japanese friend for inviting me over to make these on a rainy spring afternoon.
We followed the recipe and technique illustrated clearly by Nami of Just One Cookbook (a blog I've come to revere and resource often for Japanese cookery), and were pleasantly surprised at how simple both the dough and filling were to prepare. I say "simple" because I believed none of the 1,000 steps needed to prepare these were particularly difficult. It just requires vigilant organization, and some basic cooking skills. Also helps to have the right tools. Read through Nami's blog to make sure you have what you need.
I vow to keep making (and eating) these until my crimping improves. Work, work, work.
Note: Before you embark on this adventure, make sure you have a large bamboo steamer that fits atop a large pot. If the steamer hangs over the edge of the pot, it can burn. Wetting the steamer can help prevent catching.
The Dough
10.6 oz all-purpose flour (10.6 oz = 300 g) (and more for dusting)
2 scant T granulated sugar (scant 2 Tbsp = 20 g)
½t Kosher salt
1t baking powder
1t instant dry yeast
1T neutral flavor oil (vegetable, canola, etc)
160-170 ml water (160-170 ml = 160-170 g)
The Filling
2 dried shiitake mushrooms
½C water
1 green onion, minced
4 leaves cabbage (4 leaves = 180 g), finely chopped
1t Kosher salt
¾ lb ground pork (¾ lb = 340 g)
1 inch ginger (1" =2.5 cm or 15 g)
1t granulated sugar
1T sake
½C water
1 green onion, minced
4 leaves cabbage (4 leaves = 180 g), finely chopped
1t Kosher salt
¾ lb ground pork (¾ lb = 340 g)
1 inch ginger (1" =2.5 cm or 15 g)
1t granulated sugar
1T sake
The dough is super easy. Just combine everything but the water in a bowl, then stir in the water to form a craggy ball. Turn the ball out onto a clean, lightly floured work surface, and knead it for 10 minutes. This dough is a joy to knead. It requires very little dusting flour, and results in a glossy smooth beautiful ball.

Place the ball of dough in a lightly oiled bowl, cover with plastic wrap, and allow to rise til double in bulk (about an hour).
Meanwhile, make the filling. First, soak the mushrooms for about 15 minutes. Weigh them down with something to make sure they're submerged in the water. Remove the tough stems, and very finely chop the caps.
Sprinkle the chopped cabbage with 1t salt to draw out excess water, then squeeze out the water, and combine the cabbage with the green onion, mushrooms, ground pork, and other filling ingredients.
Assembling the Dumplings
Here's where I refer you to Nami's blog for detailed instructions. Read through it a couple of times, especially her tips on shaping the dumplings. Til then, organization is your friend.
Cut 3" squares of parchment and lay them out on baking sheets. You will place each dumpling on one square as you shape them, then steam the dumplings on the parchment.
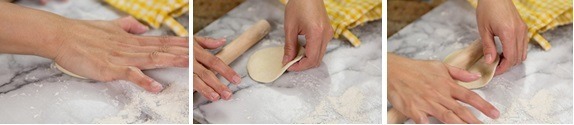
Once the dough has doubled in size, dust the working surface with flour and divide the dough in half and then roll each piece of dough into a log. Cut each log into 5 even pieces and then cut each piece in half. Form each piece of dough into a ball and dust the dough balls with flour to avoid sticking to each other. Space each ball apart and cover loosely with damp kitchen cloth to avoid drying out. Let them rest for 10 minutes.

Take a ball of dough and flatten it with your palm. Then roll it with a rolling pin into a round sheet. Here’s how I roll the dough. Hold the top of dough with left hand and use a rolling pin to roll out the dough with right hand. You only need to roll up and down on bottom half of the dough. After rolling 1-2 times, rotate the dough about 30 degree with left hand. Repeat this process until the dough becomes thin. The center of dough should be thicker than the edge.
 |
| photos from Just One Cookbook |
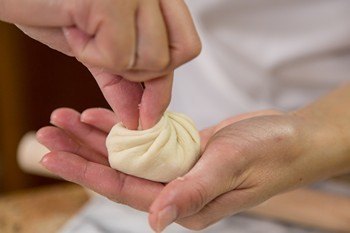
Scoop 1½T of filling (with a 1½T cookie scoop or spoon) and place in the center of the dough.
Hold the dough with the left hand and seal the bun using the right index finger and thumb. First, pick up a corner of the dough with your right index finger and thumb and pinch together. Without moving your thumb, use your right index finger to pick up the dough and pinch it with your thumb while rotating the dough clockwise with your left hand.
Repeat this process about 10-12 times (=10-12 pleats) until you seal the last part of dough by pinching it tightly. Here are some tips: your left thumb should hold down the filling and use your left fingers to turn around the wrapper. Use your left index finger to help pleating. Also, lift up the pinched pleats slightly while you make the new pleat so the filling stays inside the dough.

Once you finish sealing the last part of dough, twist the pleats further with your right index finger and thumb to maintain a tight seal. If you’re left handed, reverse the directions.
 |
| photo from Just One Cookbook |
Place the bun on a piece of parchment paper that fits the bun (for small size, 3” x 3”). Cover the finished buns with plastic wrap and repeat this process with the rest of dough. Let the buns rest for 20 minutes.
 |
| don't worry about imperfect crimping. it'll be delicious either way! |
Bring water to boil and place the steamer on top of the pot. Once the water is boiling, place the buns (with the parchment) in the steamer tray leaving about 2” between each bun (buns will get larger while being steamed). Close the lid and steam over high heat for about 12 minutes.
Serve immediately with your favorite dipping sauce. We drizzled a mixture of soy sauce, vinegar, and garlic sauce over them. Pure crack.
いただきます!
No comments:
Post a Comment