Make Something New Every Day


This blog is inspired by all those who love to cook, whether experienced or not, and who continue to experiment with new ideas & ingredients, and best of all, share their passion with others.

The first entries are recipes prepared by the students of Lionel Wilson College Preparatory Academy in Oakland, CA. Fifteen students with varying cooking experience participated in my weekly workshop (via Tutorpedia), and successfully prepared various meals, snacks, and baked goods as part of an after-school program.

Along with the recipes from that class, I will continue to add new seasonal items, spanning every genre of the culinary world, as well as a helpful list of links to recipes, instructional videos, and places to shop and volunteer in your area.

Feel free to ask me questions and share your recipes and ideas as well. I look forward to cooking with you.


December 12, 2015

Chinese Pearl Balls

I fell in love with these as a kid. In the late 70's & early 80's, there was a surge in popularity of gourmet cooking & entertaining. Most days, we ate very simply, but during the holidays, my Mom & aunts would bust out the Bon Appetit and Martha Stewart cookbooks, and make morsels of goodness that cemented my love for experimenting with flavors & textures in my own cooking. 

Aside from being irresistibly delicious, these are gluten-free, very easy to prepare, and can be made ahead and frozen, so when company arrives, all you need to do is steam and serve. 

Ingredients
3/4C glutenous rice or sticky rice (does not contain gluten) 
1# ground pork
1 green onion, minced
2t freshly grated ginger
4 water chestnuts, finely minced
1T soy sauce
1T dry sherry (optional)
1 egg, lightly beaten
2t corn starch 
S&P

Dipping sauces can vary to taste. I usually put out several options:
Plum Sauce
Hoisin Sauce
Soy sauce with rice vinegar and chili oil
Sweet chili sauce
Sriracha 

Instructions
Soak the glutinous rice in water for at least 6 - 8 hours (preferably overnight). Drain well in a sieve or colander. Spread out the rice on a baking sheet. Note: Drain and spread out the rice just before making the pearl balls, so that the rice doesn't dry out too much.

Combine the remaining ingredients in a large bowl, mixing well to incorporate all the goodies. 

Lay out a baking sheet or tray lined with parchment. Using a small ice cream scoop, a teaspoon, or your hands (keep hands wet for easier handling), make large gumball-sized balls (about 1T), and drop them onto the sheet with the rice. Roll the balls in the rice to coat evenly, and transfer to the tray with the parchment. Space them out so they're not touching. At this point the balls can be frozen for future use (freeze on the sheet pan, then transfer to ziploc bags, being careful not to lose too much rice). 
Steam the balls in batches using bamboo steamers or steamer baskets. Lightly oil the steamers to prevent sticking. Steam for about 20-25 minutes. Serve immediately. 

на здоровья! 


October 31, 2015

Triple Chocolate Brownies - ATK


 With just the right balance of cakey & chewy, and three types of chocolate keeping the sweetness in check, these babies hit on all cylinders. They're best eaten the same day as baked (the chocolate chunks stay melty), but keep beautifully in an airtight container for up to 4 days. 

Prep the Pan
Make a foil sling for a 13x9" baking pan by folding two long sheets of aluminum foil; the first sheet should be 13" wide, and the second sheet should be 9" wide. Lay sheets of foil in the pan perpendicular to one another, with extra foil hanging over edges of the pan. Push foil into corners and sides of the pan, smoothing the foil flush to the pan. Grease the foil, and set the pan aside. 

Why should I do this? Sounds like a pain. 
The foil will keep the brownies from getting too dry. After cooling the brownies in the pan, you can lift them out by the foil edges, then easily cut them. 

This is one of those recipes that pays to have all the ingredients ready in advance of mixing. 

Get it Together
1/3C unsweetened cocoa powder
1 1/2t instant espresso (optional, but recommended)
1/2C plus 2T boiling water
2oz unsweetened chocolate, chopped fine 
1/2C plus 2T vegetable oil 
4T melted unsalted butter
2 large eggs plus 2 yolks (use the extra whites to make these!)
2t vanilla extract
2 1/2C sugar
1 3/4C flour
3/4t salt 
6oz bittersweet chocolate cut into 1/2" pieces 
Trader Joe's carries unsweetened baking chocolate, as well as cocoa powder and bittersweet chocolate.
Their cold-pressed sunflower seed oil is ideal for baking. 


Preheat the oven to 350'. 
Whisk together the flour and salt. Set aside. 
In a large bowl, whisk the cocoa and espresso powders with the boiling water. Add the unsweetened chocolate and whisk until melted. 
Whisk in the melted butter and oil. The batter may separate. 
Whisk in the eggs & yolks, one at a time. Now the batter should look like chocolate pudding. 
Whisk in the vanilla extract, then the sugar.
Switch to a spatula and stir in the flour, then the bittersweet chocolate chunks.
Pour the batter into the prepared pan and bake for 30-35 minutes until a toothpick comes out with moist crumbs. 

Yes, you have to do this, or they won't set properly.
In order to get the right balance of chewy and cakey, brownies tend to be slightly underbaked. Allowing them to cool completely before cutting, ensures they set so you get that fudgy center, cakey outside, and crisp crust. 

Cool the brownies in the pan on a wire rack for 1 1/2 hours. 
Then lift the brownies out of the pan by the foil edges, and allow to cool on the wire rack for another hour. 
Cut brownies into 24 pieces and serve. 
Store in an airtight container for up to 4 days. 

на здоровья! 


Recipe by America's Test Kitchen


October 24, 2015

Budapest Coffee Cake


I've been making this cake for over 20 years. It's a crowd-pleaser, it's easy to make, and it keeps well (not that it will last beyond a day). The sour cream (undetectable by sour cream haters) keeps the cake incredibly moist. The modest amount of sugar in the recipe garners many compliments that the cake is not too sweet. 

Batter
11T Butter (5.34oz), softened 
1.5C Sugar
3 Eggs
1t Vanilla Extract
3C Unbleached AP Flour
1/2t Salt
1.5t Baking Powder
1.5t Baking Soda
2C Sour Cream (1 Pint Tub)

Filling
1/4C Brown Sugar
1t Cinnamon
1t Cocoa Powder

Grease and flour a 10" bundt pan. Preheat oven to 350'.

Beat butter and sugar together until fluffy. Add eggs, one at a time, incorporating well after each addition, and scraping down the bowl as needed. Add vanilla. Combine all dry ingredients in a bowl. Add dry in 3 parts, alternating with the sour cream in 2 parts. 
The finished batter will be thick. 

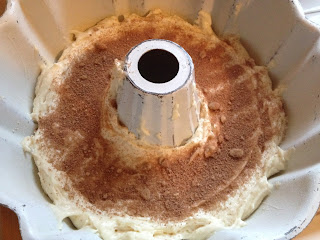
Combine the filling ingredients in a small bowl. Spread 1/3 of the batter in the bottom of the bundt pan. Sprinkle with the filling. Add another layer of batter, and another layer of the filling. Top with the final 1/3 of the batter. Spread smooth. Bake for 50-60 minutes til the cake starts to pull away from the sides of the pan, and a skewer inserted into the thickest part of the cake comes out clean. 
Ready for the oven. The cake will rise past the top.
Allow the cake to cool in the pan for 5 minutes before inverting.
Cool completely before cutting. 
Tip: Store extra filling for next time.

Mad props to my baking femtor, Jule Vranian for the recipe!

October 2, 2015

Mushroom Potato Onion Pirog (Russian Savory Pie)


Whole Foods charges about $4 a slice for something like this. I made two whole pies (10"x5") for about $10 total. And that was using purchased puff pastry, which is both easy to work with and tasty, but you could make your own dough (a traditional pie dough) if you prefer. 

I like to share these (either whole pies or individual turnovers) with friends on camping trips, picnics, concerts, etc. These are for HSB15. Fall is in the air, and the combination of caramelized onions and mushrooms with potato wrapped in a golden pastry is really satisfying.

What You Need
1 box Pepperidge Farm puff pastry sheets 
1.5# russet potatoes
1 large onion
8oz crimini mushrooms 
olive oil
S&P
an egg for eggwash 

How to Make it
The puff pastry comes frozen. Thaw the whole box in the fridge overnight. Keep them cold as you prepare the filling. 

Peel, cube and boil the potatoes (with 2t salt) until soft. Drain and roughly mash them. 
Dice the onion, and saute in olive oil until soft.
Slice the mushrooms and add them to the onions. Sprinkle with S&P. Crank up the heat and saute til the onions are golden brown and the mushrooms are tender. You can deglaze the pan with a little dry sherry if you like. It adds a nice flavor and helps collect all the flavors from the pan. 
Combine the onion mixture with the potatoes and let it cool to room temp. You can also make this mixture ahead and chill it overnight. 

Preheat oven to 425' (you will reduce the heat to 400' after you put the pies in). 
Line 2 baking sheets with parchment. 
Flour a work surface and unfold one of the pastry sheets. Keep the 2nd one in the fridge. 
Gently roll the square out a bit making it about 2" bigger all around. Spread half the filling evenly in the center of the dough, leaving about 3" on each side, and 1" at the top and bottom. Join the sides over the center of the pie, pinching the dough together to create a tight seal. Seal and crimp the top and bottom as well. Gently lift the pie and place it in the center of a baking sheet. Glaze with egg wash. Place the baking sheet in the freezer or fridge while you repeat the process with the second pie. 

Bake the pies at 400' for about 30-40 minutes. Rotate the baking sheets halfway through. The pies should be deeply golden brown. Cool on a rack. Either serve slightly warm, or cool completely and store wrapped at room temp for up to a day. Beyond that, you should keep them in the fridge, though that will make the dough gunky. Just eat them within a day. It won't be a problem. Trust me. 

на здоровье! 

August 30, 2015

Sweet Potato Tacos with Zingy Coleslaw

Why did I wait so long to post this staple to my diet? The epitome of my mantra (Tasty Cheap Easy), these tacos always hit the spot. 

Now why would anyone post a recipe for tacos? I can't think of a more elastic and widely interpreted dish. All I can tell you is that the texture/flavor mix of my favorite cheap version is really satisfying, and the keys are as follows:
Hannah Sweet Potatoes: Tan skin, white flesh. Kind of like a yukon gold, but sweeter. 
La Tortilla Factory Green Chili Tortillas: A magical corn/wheat combo that can take a lot of crisping, but stays chewy and soft. Vegan. Local.
Coleslaw that's more vinegary than mayonnaisey: What can you tell from this photo? Nothing. But I can tell you that people who hate mayonnaise like this coleslaw.
Get it Together

The Slaw
Whisk together
2T mayo
1T dijon mustard
2t maple syrup
3T apple cider vinegar
Toss in: 
Half a cabbage, shredded finely
2 carrots, shredded
1 green inion, thinly sliced
Season with black pepper (it shouldn't need any salt)

The Sweet Potatoes
Peel and slice the potatoes about 1/4" thick. Steam for about 10 minutes (til fork tender but not mushy). At this point you can use the potatoes in the tacos, or sear them in a little butter for added flavor. 


Assembly
Heat a large skillet on medium/medium-high. No oil needed. Heat tortillas until golden brown. 
At this point you can add any toppings you crave. Some combos I like include a bed of salsa-style refried beans, pepper jack, avocados and tomatoes. 

Longevity
Slaw is good for a few days, as are extra cooked sweet potatoes. So you can make several meals out of this and eat very well for a couple bucks a day. 


на здоровья! 


August 21, 2015

Pesto Dedicated to Someone I Love...


I have the best friends. Today one of them came over to visit me in my new place, and as she was leaving, she shared with me how happy she was that I finally found my home. I could see that she had been with me through my long wait (and near misstep into taking the wrong apartment). She is a true friend.

These are the people I live for and love most to cook for and with. Pardon my ending a sentence with a preposition, but it's true.

So here it is. Pesto. 

  • Basil (about 4 ounces, or one large bunch)
  • Olive Oil (up to 1/2C)
  • Garlic (2 cloves)
  • Lemon Juice (about 1T to taste)
  • S&P
  • Parmigiano reggiano (about 1/4C)
  • Toasted Pine Nuts (about 1/4C) 

If making a large batch, use a Cuisinart or blender. A mini-prep works great for smaller batches. 
Pick leaves off stems. Wash & dry leaves if they're noticably dirty. You don't want grit it your pesto.
Toast pine nuts in a dry pan on the stove. Don't walk away. They go from 0-60 in no time. 
Stuff the leaves into the blender/food processor. Add the garlic, pine nuts, parm, about 1/2 the oil, and about 1/2 the lemon juice. Sprinkle with a little kosher salt and pepper. 
Blend until chopped up. Stop and scrape down the sides, and blend again until pesto-like. 
Add more oil to make the right consistency. You can also add a tiny bit of water. 
Adjust the lemon juice salt & pepper to taste.
Serve immediately. Store in the fridge in an airtight glass container for up to one week, or freeze in ice cube trays for easy use later. 

Recommended uses:
Roasted Potatoes with Pesto (great hot or cold)
Grilled Vegetables and Fish
Homemade Gnocchi with Pesto & Goat Cheese 
Pizza

A mini-prep is ideal for small batches of pesto and other quick sauces and salsas.

The mini-prep blade is designed to rotate clockwise on one speed, and counterclockwise on the other, helping to incorporate ingredients.


August 11, 2015

Curried Rice with Avocado and Tomato


It occurred to me the other day when I posted my recipe for rice patties made from leftover curry rice, that although that post includes the recipe for the curried rice, that some folks may want the down & dirty simple recipe for the rice on its own. So as I sat down to eat my easy-peasy super-cheap delicious lunch, I snapped a photo before my first bite (that took will power!)

This meal is really satisfying but doesn't leave you in a food coma, so it's great for work. You can also make 4 meals for hella cheap (depending on where you buy that avocado!)

So here's the recipe (which is really just cooking rice with a little yellow curry powder & cumin). I like to top it with avocado, freshly picked cherry tomatoes, and a sprinkle of S&P. Enjoy! 

To Make Yellow Curry Rice
Boil 1.5 cups of water and set aside (microwave for 3 minutes).
Measure 1 cup dry white rice (I find that jasmine, or any regular medium-grain rice works well)
Heat 1 teaspoon butter or olive oil in a quart-sized saucepan (one that has a lid)
Stir in the rice, & add about 2 teaspoons yellow curry (I like the Sun Brand Madras Curry), 1/2 teaspoon ground cumin, and 1/4-1/2 teaspoon kosher salt.
Pour the 1.5 cups of boiling water over the rice. It will come to a rapid boil. Stir, cover with the lid, & turn the heat all the way down. A gas burner should be barely going. On an electric burner, use the lowest setting.
Set your timer for 20 minutes. Do not take the lid off the rice during this cooking time.
Once the timer goes off, turn off the burner but LEAVE THE LID ON THE RICE FOR ANOTHER 5 MINUTES.
Remove the lid and fluff the rice with a fork, top with whatever, and eat. 
If you prefer, omit or change the seasoning as desired. Just remember that salt it key. You can also use veggie or chicken broth for more flavor. Add onion, herbs, & almonds or pine nuts for a pilaf.
Store leftover rice in a container in the refrigerator for up to 5 days. 

August 8, 2015

Sauerkraut


Why make your own sauerkraut? 

  • Many store-bought varieties are pasteurized as they are packaged, so they don't retain the probiotic benefits of a fresh batch. 
  • It's easy. You basically squeeze salt into shredded cabbage, then let it sit in a jar for about a week. 
  • It's cheap. One cabbage (about $1) makes about 3C of sauerkraut. 
  • It's fun. If you're exploring making more of your own food, this is an easy way to start. 


As simple as this process is, first-time fermenters may have a lot of questions about food safety and general trouble-shooting. Rather than reinvent the wheel, I'll refer you to this wonderfully laid out blog that includes lots of pictures and step-by-step instructions. 

I just put up a batch, and can't wait to add it to roasted potatoes with caramelized onions and mushrooms, sausages, tacos, and more. 

На здоровье!

July 24, 2015

Israeli Couscous Slaw


My friend and coworker Erin asked me to share the recipe for this salad I posted on FB last week. So here it is! 
Makes 3-4 generous servings.

The Couscous
1C toasted Israeli couscous 
1T olive oil
2C hot water

The Extras
2-3T minced preserved lemon rind (or 2t fresh lemon zest)
1/4C chopped parsley
1 scallion, thinly sliced 
1 large or 2 smaller carrots, grated
1/2 a small or 1/4 of a large red cabbage, very thinly sliced
rice vinegar 
red wine vinegar 
S&P
olive oil
1/2C toasted slivered almonds 
dried cranberries (optional)

Toast the almonds in a dry pan, and set aside. 

Heat the 1T olive oil in a pot, and stir in the couscous for 3-5 minutes. Add the hot water and bring to a boil. Lower the heat and simmer covered for 10 minutes, or until the liquid is absorbed. (Turn off the heat when the couscous has absorbed all the liquid but still looks like it's covered in paste. This starch will absorb into the couscous as it cools.)

Transfer the couscous to a bowl and stir in the preserved lemon (or zest). Spread out the couscous in the bowl to help it cool while you prep the rest of the ingredients. 

When the couscous has cooled to near room temperature, add the rest of the ingredients. Dress it with a few dashes of the vinegars, season with S&P to taste, and drizzle with olive oil.

Reserve the almonds and cranberries as a garnish just before serving. 

Like most pasta salads, this will keep well in the fridge for a few days, and can be prepared a day ahead. Make it on a Sunday, and you'll have lunches for Monday and Tuesday. 

Notes:
For some reason the bulk Israeli couscous from Whole Foods works better for this recipe's couscous/water ratio. If using the boxed one from Trader Joe's, follow the directions on the box.

Store bulk blanched almonds in the freezer to keep them fresh.

April 17, 2015

Israeli Couscous with Preserved Lemon, Tomatoes & Parsley


And pine nuts. And shallots. Israeli, or pearl couscous is just a round pasta that you happen to cook more like rice or quinoa, so you can add whatever you like to it. Traditionally the added ingredients are Mediterranean or Middle Eastern. I made this version as a side for Easter, and my sister asked for the recipe, so here it is.

The Couscous
2C toasted Israeli couscous (Trader Joe's carries boxes, or you can get bulk at Whole Foods, etc.)
1T olive oil
4C hot water

The Extras
1 shallot, minced
3T minced preserved lemon rind (or 1T fresh lemon zest)
juice of 1 lemon
olive oil 
S&P
1/4C chopped parsley 
1C cherry tomatoes, halved
1/2C toasted pine nuts 

Toast the pine nuts in a dry pan, and set aside. Prep the rest of the ingredients. 
Heat the 1T olive oil in a pot, and stir in the couscous for 3-5 minutes. Add the hot water and bring to a boil. Lower the heat and simmer covered for 10 minutes, or until the liquid is absorbed. 
Remove from heat and add the lemon juice, shallot, preserved lemon and a drizzle of olive oil to the warm couscous. 
When the couscous has cooled to near room temperature, add the parsley, tomatoes and pine nuts. Season with S&P to taste. 
Like most pasta salads, this will keep well in the fridge for a few days, and can be prepared a day ahead. 


March 6, 2015

Anti-Inflammatory Orange Avocado Chia Smoothie


Not trying to take credit for this one. Just sharing a tasty smoothie that has a lot of anti-inflammatory and antioxidant ingredients, like turmeric, ginger, spinach, oranges and coconut water. 

Next time you go to Trader Joe's, add these ingredients to your cart (I'm pretty sure you can find everything you need at TJ's):

Baby Spinach
Oranges
Avocados
Ginger
Chia Seeds 
Coconut Water
Cinnamon
Turmeric Powder 

Here's the link to the recipe (it's very simple - just easier to link here), as well as good info on how the ingredients can help reduce and prevent inflammation in your body.

The ingredients in this recipe are well-balanced, resulting in a pleasant, creamy green smoothie with natural sweetness (I don't even add honey). To ensure the chia seeds get pulverized, run your blender for a good minute (maybe less if you use a Vitamix). 

Enjoy!


January 25, 2015

Gluten & Guilt-Free Black Bean Brownies

There really is no bad with this brownie. They mix up in minutes, are high in fiber and protein, low in carbs and fat, and are gluten free. Even better, they really taste good and satisfy my craving for chocolaty baked goods, without guilting me into self-flagellation afterward. 

Ingredients
1 15oz can black beans, rinsed and drained 
3T grapeseed or vegetable oil (or melted coconut oil)
3 large eggs
1/2C brown sugar, packed
1/3C cocoa powder, sifted 
1/8t fine sea salt
1t vanilla extract 

Preparation
Preheat oven to 350'. 
Oil an 8" brownie pan, or use a nonstick pan. 
Puree the black beans with the 3T oil until smooth (like hummus). Add a bit more oil if needed. (A mini prep works great for this.)
Whisk together the eggs, sugar, vanilla, and salt. 
Stir in the pureed beans and cocoa powder. 
Pour into the pan, and bake until set, and the brownies come away from the sides of the pan, about 20-25 minutes. Do not overbake. 

Cool before slicing. If you cut the 8" square into 9 pieces, each serving will have about 155 calories.