Make Something New Every Day


This blog is inspired by all those who love to cook, whether experienced or not, and who continue to experiment with new ideas & ingredients, and best of all, share their passion with others.

The first entries are recipes prepared by the students of Lionel Wilson College Preparatory Academy in Oakland, CA. Fifteen students with varying cooking experience participated in my weekly workshop (via Tutorpedia), and successfully prepared various meals, snacks, and baked goods as part of an after-school program.

Along with the recipes from that class, I will continue to add new seasonal items, spanning every genre of the culinary world, as well as a helpful list of links to recipes, instructional videos, and places to shop and volunteer in your area.

Feel free to ask me questions and share your recipes and ideas as well. I look forward to cooking with you.


Showing posts with label potatoes. Show all posts

May 22, 2016

Hash Browns: Easier Than You Think


The potato. Rooted deep in Russian dogma, you can bet that my blood will regularly test positive for tubers. 

Last week I began a food jag that I have since repeated more times than I care to admit. I started making my own hash browns. This takes just a few minutes to prep, and about 15 to cook. 

Minutes to Magic
1# potatoes (russets or yellow, preferably organic)
1/2 an onion
salt
pepper
garlic powder
turmeric 
oil or butter (or both)

Tools
food processor with shredder disc
or a box grater
cheesecloth* or a clean kitchen towel (or paper towels)
a large bowl
10" nonstick pan (or well-seasoned cast iron)
flexible cutting board 

To peel or not to peel...
If the potatoes are organic and the skins are relatively blemish-free, just give them a good scrub with a vegetable brush and some cold water. Otherwise, peel them. If using a food processor, attach the shredder disc, and cut the potatoes in half widthwise so they'll fit into the feeder. Cut the root end off the onion, and peel off the outer layers. Grate the onions and potatoes together. If you don't have a food processor, grate them on a box grater. 
Squeeze all the liquid out of the potatoes and onions. Paper towels usually tear, so I prefer using a cheesecloth or clean kitchen towel. Twist the cloth to help push the potatoes into a ball, then squeeze the ball as you twist to get as much liquid out as possible. This will give you crisp hash browns instead of mush. 
Toss the shreds with salt & pepper (the basics), and add whatever other seasoning you like (I like garlic powder and turmeric). 
Heat the pan on medium-high, and add 2T oil (or butter, or 1T each). Coat the pan, and spread your shreds evenly, tucking in the edges and patting the whole thing down with a spatula. You want it packed so when you flip it over, it doesn't fall apart. Turn the heat down to med-low, and cook for about 8 minutes. This will vary depending on the heat and what type of pan you use. 
Use the spatula to loosen the edges a bit, and in one quick confident motion, flop the whole thing out onto a cutting board. Turn the heat back up to med-high, add 2T of oil, and slide the whole thing back in to brown the other side. Turn the heat down to med-low, and cook for about 5-8 minutes. Serve immediately. 
Flipping the potatoes out onto a flexible cutting board makes it easy to slide them back into the pan. The name of the game is CONFIDENCE.


Variations: During the summer you may want to add some grated zucchini, and during the winter, you can try a variety of root vegetables. Top with a fried egg for a heavenly experience. 


*You can find cheesecloth at a fabric store, Cake Art in San Rafael, or Sur La Table. It's inexpensive, infinitely reusable, and serves many purposes in the kitchen.

На здоровье! 

October 2, 2015

Mushroom Potato Onion Pirog (Russian Savory Pie)


Whole Foods charges about $4 a slice for something like this. I made two whole pies (10"x5") for about $10 total. And that was using purchased puff pastry, which is both easy to work with and tasty, but you could make your own dough (a traditional pie dough) if you prefer. 

I like to share these (either whole pies or individual turnovers) with friends on camping trips, picnics, concerts, etc. These are for HSB15. Fall is in the air, and the combination of caramelized onions and mushrooms with potato wrapped in a golden pastry is really satisfying.

What You Need
1 box Pepperidge Farm puff pastry sheets 
1.5# russet potatoes
1 large onion
8oz crimini mushrooms 
olive oil
S&P
an egg for eggwash 

How to Make it
The puff pastry comes frozen. Thaw the whole box in the fridge overnight. Keep them cold as you prepare the filling. 

Peel, cube and boil the potatoes (with 2t salt) until soft. Drain and roughly mash them. 
Dice the onion, and saute in olive oil until soft.
Slice the mushrooms and add them to the onions. Sprinkle with S&P. Crank up the heat and saute til the onions are golden brown and the mushrooms are tender. You can deglaze the pan with a little dry sherry if you like. It adds a nice flavor and helps collect all the flavors from the pan. 
Combine the onion mixture with the potatoes and let it cool to room temp. You can also make this mixture ahead and chill it overnight. 

Preheat oven to 425' (you will reduce the heat to 400' after you put the pies in). 
Line 2 baking sheets with parchment. 
Flour a work surface and unfold one of the pastry sheets. Keep the 2nd one in the fridge. 
Gently roll the square out a bit making it about 2" bigger all around. Spread half the filling evenly in the center of the dough, leaving about 3" on each side, and 1" at the top and bottom. Join the sides over the center of the pie, pinching the dough together to create a tight seal. Seal and crimp the top and bottom as well. Gently lift the pie and place it in the center of a baking sheet. Glaze with egg wash. Place the baking sheet in the freezer or fridge while you repeat the process with the second pie. 

Bake the pies at 400' for about 30-40 minutes. Rotate the baking sheets halfway through. The pies should be deeply golden brown. Cool on a rack. Either serve slightly warm, or cool completely and store wrapped at room temp for up to a day. Beyond that, you should keep them in the fridge, though that will make the dough gunky. Just eat them within a day. It won't be a problem. Trust me. 

на здоровье! 

November 29, 2014

Борщ!


On a chilly March weekend several years ago, my posse gathered at Haypress Campground for Lauren Fiel's birthday. Recent rains turned trails to rivers, and by the time we pitched camp we were ready for a nice hot communal meal. I brought a few jars of my Mom's (now famous) borscht, and with it gained a new crop of Russian soup evangelists. 

Just as it takes five English letters to emulate two Russian ones, this borscht blog may seem bombastic. My advice for first-time borschters is to read it through, and taste as you go. Soup is not an exact science, but the techniques within give my Mom's version a depth of flavor that truly celebrates its humble ingredients. Ha здоровье! 

Shopping List
1# beets (about 3 large, 4 medium)
3/4# carrots (3-4)
3/4# yukon gold potatoes, yellow, or white potatoes (3-4)
3/4# cabbage (1 tiny, or 1/2 regular)
1 large white or yellow onion
1 leek or shallot
2 cloves garlic
14 oz canned or jarred tomatoes, peeled & seeded (preferably unsalted), and pureed*
olive oil
dill
apple cider or red wine vinegar (about 1/4C)
salt & pepper 
sugar (optional) 

Instructions
Roast the beets. This can be done a day ahead, or several hours ahead of making the soup. Cut the greens away from the beets, without cutting into the beets themselves. Don't cut the root end either. Leaving a 1/2" of the greens at the top will prevent beet juice from leaking out during roasting. A little will, so line a sheet pan with foil, scrub the beets well with a brush and cool water, and roast the beets whole for 30-60 minutes depending on their size. You want them yielding, but not mushy. 
Roasted beets
Prepare the Soup
Peel the cooled beets and grate them in a food processor. Wearing latex gloves will keep the mess and stained hands at bay. Peel and grate the carrots. 
Heat a very large stock pot and add a few tablespoons of olive oil. On low heat, cook the beets and carrots for about 20 minutes, stirring occasionally to prevent sticking. 
Grated carrots and roasted beets. 
Meanwhile, dice the onion, leek or shallot, and mince the garlic. Peel and dice the potatoes. Core the cabbage, slice it lengthwise into wedges, then slice into thin shreds (a little thicker than you would for cole slaw). 
After 20 minutes of sauteing the beets & carrots, remove them from the pot, and set them aside for later. 
Add about 3T of olive oil to the pot, and saute the onion and leek or shallot until translucent. Stir in the garlic and saute for another minute or two. 
Stir in the cabbage and cook it down for just about a minute, stirring as it wilts. Stir in the potatoes.
Sprinkle them with about 1T kosher salt. Stir in the pureed tomatoes, then add 3Qts of hot water. Bring the mixture to a boil, then reduce the heat and simmer for about 10 minutes. 
not yet...
Stir in the beets and carrots. Adjust the seasoning. Stir in the vinegar and dill. Adjust the seasoning. If the soup is too acidic, stir in about 1T of sugar. 
Борщ!
Serve immediately. 
Refrigerate cooled soup in airtight containers for up to 1 week, or freeze in mason jars for up to 6 months. 
Makes 1.1 cubic Sweeneys. (A lot.)


* I found this marvelous organic tomato puree at my local Mediterranean market. The ingredients are simply organic tomatoes, peeled, seeded, and pureed. No salt or anything else added. I used about 2/3 of the jar, and will make a marinara with the rest. Delightful. 

.

October 6, 2011

Gnoc-Gnoc-Gnocchi at Heaven's Door

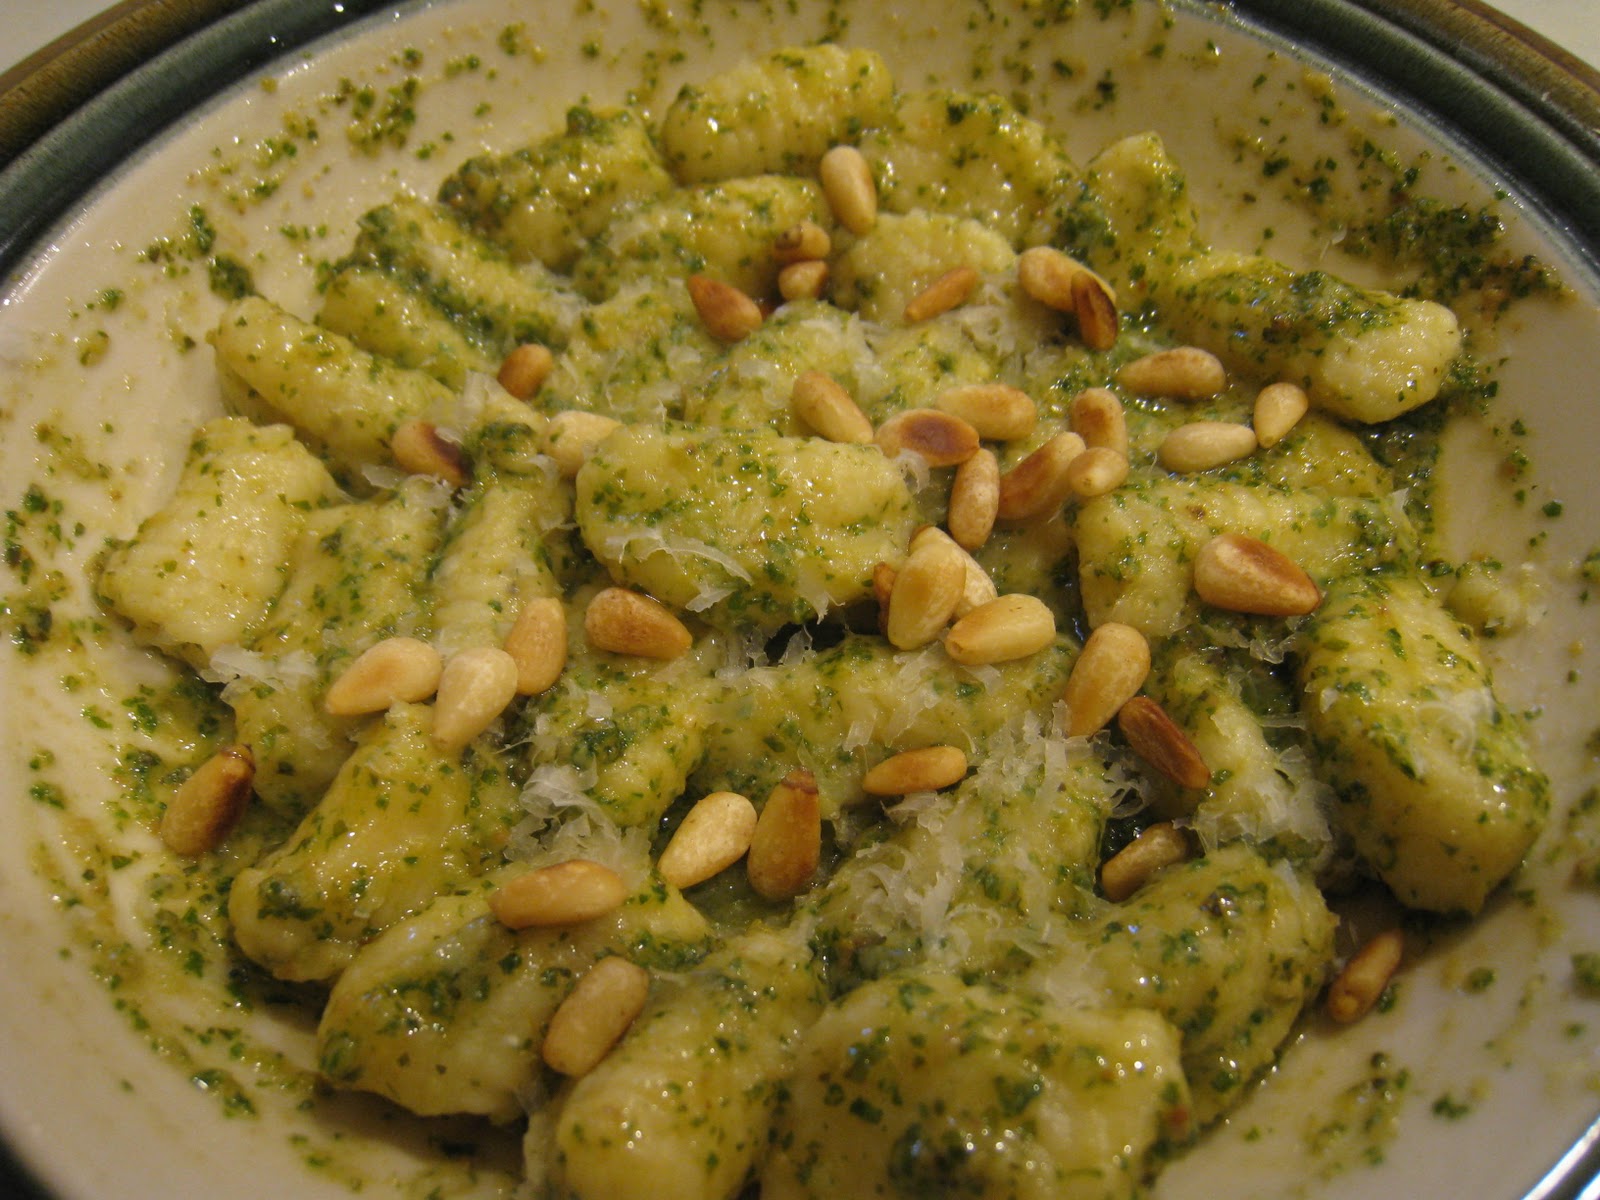
Part Deux of my Rainy Day Woman Homage to Deliciousness is homemade gnocchi with pesto. This is my 3rd attempt at gnocchi, and I nailed it. The recipe I used has very good instructions, but since I don't have a Nona to show me the light (and perhaps you don't either), I wanted to add some helpful photos & a few extra tips that made a big difference in my results.

Here Are My Top 5 Tips for Good Gnocchi

  1. Work with confidence. Reading through the recipe and staying organized will keep you ahead of the game. If you execute each simple step, you will get a great final product.
  2. Set out all of your ingredients ahead of time. Once the potatoes are cooked, you'll want to work quickly to combine the dough and shape the gnocchi.
  3. Steam adds unwanted moisture. Let the riced potatoes cool a bit before mixing in the other ingredients. You can use less flour this way, resulting in light, tender dumplings.
  4. When shaping the gnocchi, keep your hands, work surface, and tray floured to prevent sticking.
  5. Freezing the gnocchi before cooking helps. Make sure you have a large roomy pot of salted boiling water, and let them cook for a full 2 minutes once they rise to the surface. Keep the tray in the freezer and cook the gnocchi in batches.
Cooling the riced potatoes on the counter.
A well in the potatoes, filled with yolks, cheese, and seasonings.
Using a bench scraper to quickly & cleanly combine the ingredients.
Once the flour is added, test the dough for firmness. It should give slightly & hold its shape. Only use enough flour to get to this point. 
Separating the dough into 1/4s, rolling it out, and cutting even pieces.
Roll each piece on a gnocchi board, or use the back of a fork using a "somersault" motion. Dust with flour to prevent sticking.
The crevice in the gnocchi helps it cook quickly & remain tender. Freeze on a floured tray. Don't crowd them. 

Here is the recipe I used. It has terrific instructions. I hope my tips & photos help you achieve the same success I did. Good luck! (Makes 3-4 servings)

http://www.foodnetwork.com/recipes/michael-chiarello/potato-gnocchi-recipe/index.html

Pesto
1 cup of washed & dried basil leaves
2 cloves of garlic, pressed
3 tablespoons toasted pine nuts
1/4 cup grated parmesan cheese
olive oil
salt & pepper

Using a mini-prep or blender, pulse the basil leaves & garlic until finely minced.
Add the pine nuts and cheese, and drizzle liberally with olive oil (about 3 tablespoons to start)
Blend, and check the consistency. Add more oil until you get a pesto.
Season with salt & pepper.
Either refrigerate in an airtight container for up to one week, or freeze in ice cube trays, then transfer to a freezer bag. Defrost cubes of pesto as desired.

Makes about 3/4 cup