Make Something New Every Day


This blog is inspired by all those who love to cook, whether experienced or not, and who continue to experiment with new ideas & ingredients, and best of all, share their passion with others.

The first entries are recipes prepared by the students of Lionel Wilson College Preparatory Academy in Oakland, CA. Fifteen students with varying cooking experience participated in my weekly workshop (via Tutorpedia), and successfully prepared various meals, snacks, and baked goods as part of an after-school program.

Along with the recipes from that class, I will continue to add new seasonal items, spanning every genre of the culinary world, as well as a helpful list of links to recipes, instructional videos, and places to shop and volunteer in your area.

Feel free to ask me questions and share your recipes and ideas as well. I look forward to cooking with you.


December 6, 2013

No Knead to Panic. Easy Buttery Dinner Rolls.


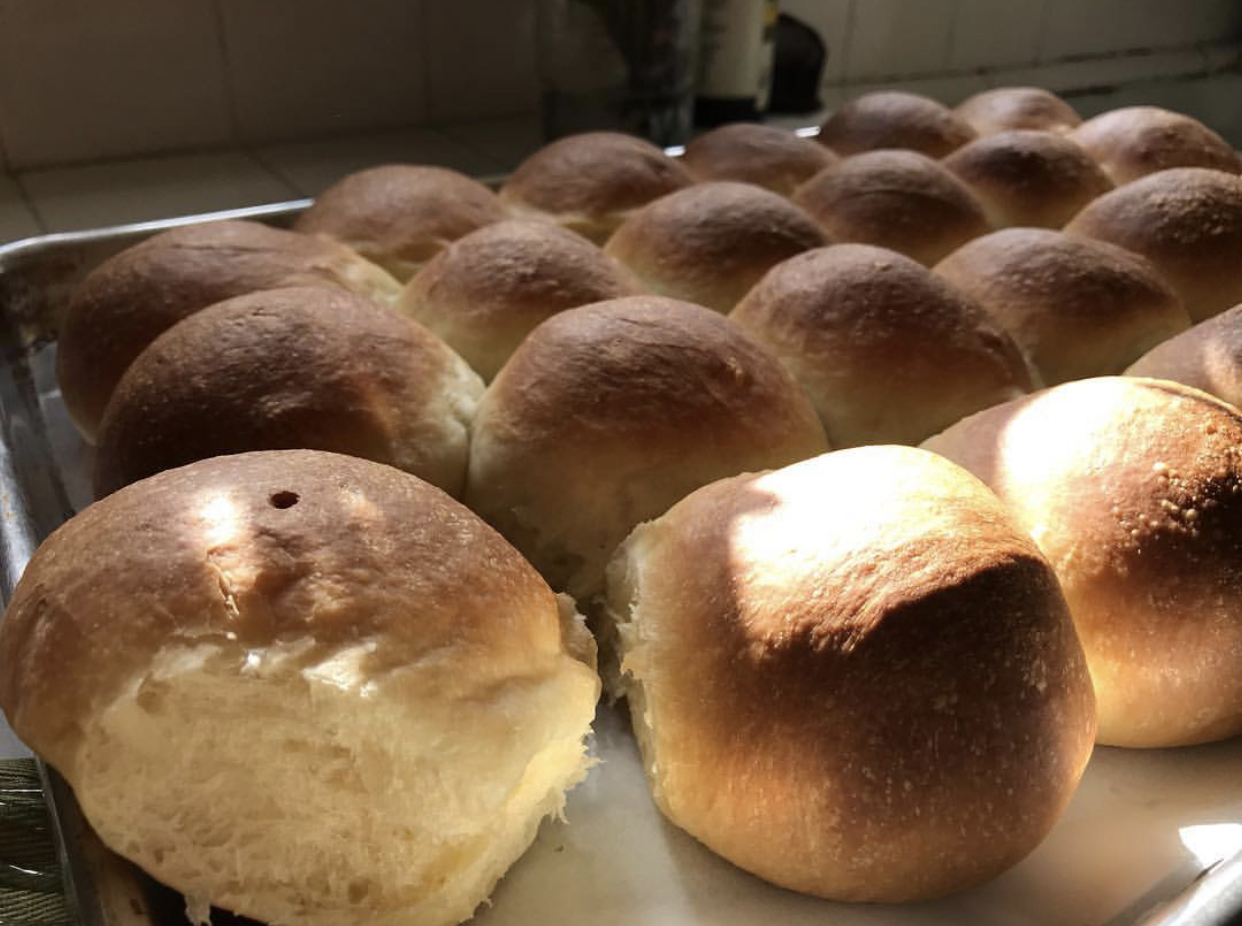
I've tried various recipes and techniques for yeast-based dinner rolls, and so far these are my top seed. The dough mixes up in minutes and requires no hand kneading after its time in the mixer. The only real "work" is dividing the risen dough into 24 equal pieces and shaping them into balls— and as I proved on the eve of Thanksgiving, this task goes quickly and is way more fun when shared with a friend. 

Store the shaped, unbaked rolls in the fridge overnight, then bake the rolls fresh just in time for dinner. As the dough rises whip up some compound butters. Fresh chive butter makes these already addictive rolls irresistible. 

Make the Dough
1 Packet Yeast (1/4oz, 2 1/4t)
1/3C Sugar
1/2C Warm Milk (heated to 110-115')

6 1/2C AP Flour
2t Fine Sea Salt
1.5 Sticks Unsalted Butter, softened (plus 1 stick melted for brushing)
1 Egg, lightly beaten
1 1/4C Milk, room temp 

Start the Yeast
Warm 1/2C milk in a liquid measuring cup. Gently stir in the sugar and yeast, and let it sit for 5 minutes until foamy. 

Mix the Dough
Add the yeast starter to a mixing bowl fitted with a hook attachment. Stir in the softened butter, half the flour, and half the remaining milk. Start slow, then mix until incorporated. Mix in the egg. Then add the rest of the flour and milk. Start slow, then mix for a few minutes until the dough comes together and pulls away from the bowl. It will be sticky. 
The dough before the 2nd batch of flour and milk are added.
Let it Rise! 
Dump the dough into a large oiled bowl, cover loosely with plastic, and let rise in a warm place (not hot) for about 2 hours until the dough has doubled in bulk.
The dough before rising.

Prep the Pans, Shape the Dough
Line a baking sheet with parchment. On a clean work surface (a floured wooden cutting board or clean counter top) dump out the doubled dough, and gently punch it down and give it a few light kneads to get the air out. Using a knife or bench scraper, cut the dough in half. Then divide each half into 12 equal pieces (24 total). Shape each piece into a ball by gathering the edges together, pinching them to seal. Then roll the ball in a tight circle cupped in your hand, against your work surface to create a smooth ball. Distribute the rolls evenly spaced on the lined pan. Cover pan with plastic wrap and store in the fridge for 8 hours or overnight.


To Bake
Remove pan from fridge and leave at room temperature for one hour or more before baking. Preheat oven to 375'. Brush the tops of the rolls with melted butter and sprinkle with kosher salt or fancy-pants salt flakes. Bake for about 20-25 minutes until deep golden brown. Turn the pans after about 15 minutes to ensure even baking. Remove the pan and brush the rolls (again!) with more butter. Cool on rack at least 10 minutes before serving. 

Rolls can be baked at least a day ahead. 

Storage
Store remaining cooled rolls in a ziploc bag or airtight container for up to 1 week. Rolls can also be frozen and reheated in foil at 300' until warm.

Chive Butter
Cream 1C (2 sticks, 1/2#) unsalted butter until soft.
Stir in 2-3T finely minced chives.
Season with a little kosher salt to taste.
Transfer to a small serving bowl or ramekin. Cover with plastic and refrigerate, or serve immediately. Store extra butter covered in the fridge for up to 3 weeks. Note: Compound butters that contain fresh herbs or vegetables can spoil faster than regular butter. If you don't need the extra butter for a while, wrap it tightly in parchment, then plastic wrap, then a Ziploc freezer bag. Thaw in the fridge or at room temperature before serving. Do not refreeze, or eventually it will turn gross. 

June 14, 2013

Best. Cookies. Ever.

or just really good cookies that someone brought a lot of to work. people like lots of free cookies. I like to bake cookies. here we go.

this is a very basic "chocolate chip" cookie recipe. you can add about 3C of assorted goodies to the basic dough. a mix of dried fruits, chocolate and nuts is a typical "cowboy" cookie. oats soak up a bit more of the moisture, so you'll get a denser cookie with oats.
you wanna eat a cowboy? giddyup. 

1C unsalted butter
3/4C each, white and light brown sugar
2 XL eggs
1t vanilla
2 1/3C unbleached white flour
1t salt
1t baking soda

and in this case...
3C total of semisweet chocolate chips, dried cherries, shredded coconut, and toasted pepitas. When dry toasting the pepitas on the stove, I add about 1/2t of kosher salt. Let them cool before stirring them into the dough.

Butter works best when cool room temperature. Better to cream it a bit longer when cool than let it get greasy. Once beaten until fluffy, add the white sugar...beat...then the brown...beat some more. Scrape down the sides of the bowl and beat in one egg until combined and the dough is fluffy. Beat in the 2nd egg until the dough is as combined as its gonna get. Stir in the vanilla, then stir in the flour mixture. If using a stand mixer, pulse the switch between "off" and the lowest setting to "pulse" in the flour. If you just let 'er rip, your flour will fly out of the bowl and all over you and your counter.

Barely stir in the flour. Then add your goodies and stir a bit more. Turn off the mixer, scrape the dough off the paddle, and use a spatula or wooden spoon to give the dough a final stir to incorporate the ingredients.

At this point you can chill the dough, or scoop & chill the dough, or just scoop and bake the cookies, then systematically eat them until you want to die a happy, chocolatey death. Using a golf ball-sized ice cream scoop will yield evenly-sized cookies. Scoop and level the dough to fit 12 cookies to a standard baking sheet.

Line baking sheets with parchment paper for even baking and easy clean-up. Bake at 350' for anywhere from 10-14 minutes, depending on your oven. Slide baked cookies' parchment onto cooling racks, and store cooled cookies in airtight containers for up to a week.

#nomnomnom

April 10, 2013

Under 300 Calories. Less than $2. Delicious. Nutritious. Real Fast Food.


It's hot. You're busy as ever with work, friends, family, the gym...

You want to eat something substantial, yet light. Delicious, yet healthy. Oh, and p.s., you're too busy to cook, and you have no money. 

Never fear! Behold the first of several of my favorite meals that address all of these issues.

Organic Girl Super Greens with Warm Roasted Potatoes and 
Kicky Pickled Ginger Vinaigrette 

1.25 oz greens (10 calories!)
1 medium yukon gold potato (about 110 calories)
2T vinaigrette (about 150 calories)

I am just crazy about this mix. Contrary to the serving suggestion, I find that when topped with something hearty like a potato, I can get about 4-5 servings from a 5oz package. 

For years I have agonized over the limpness of traditional "spring mix" greens. 

When the weather turns warm, I'm all about creating quick, satisfying salads topped with anything from potatoes to steak, and this uber nutritious mix of baby red chard, baby tat soi, baby spinach, baby green swiss chard, & baby arugula stands up to whatever I throw on it. Get the big container, make a big batch of dressing, and you'll find yourself eating and loving your veggies every day.

The Potatoes
I like any thin-skinned variety, and prefer fingerlings, as they are pretty small, roast quickly, and have an irresistible creamy texture. 

Rub potatoes with a little bit of olive oil, sprinkle with salt & pepper, and roast at 375' until tender (when pierced with a knife they offer some resistance), about 20-25 minutes. Larger potatoes like yukon golds can take longer to roast. If you have a microwave you can nuke them for 1-2 minutes to give them a running start, but be sure to finish them off in the oven to bring out their flavor. 

Vinaigrette
While the potatoes are roasting make a quick vinaigrette. I don't seem to tire of this basic recipe. Make about a 1/2 pint so you have it ready to go. Take half of it to work with you.

Ginger (peel & thinly slice about 5 slices; soak in about 1/3C of Seasoned Rice Vinegar for about 20 minutes)
Shallot (finely mince about 2 teaspoons)
Citrus (I like a couple tablespoons of freshly squeezed OJ)
Olive or Grapeseed Oil (the latter is just as healthy as the former, has a more delicate flavor, and doesn't congeal as much when refrigerated)
Salt & Pepper

Mince the pickled ginger, and combine with the vinegar, OJ, and shallot in a 1/2 pint jar. Sprinkle with a bit of salt & freshly ground pepper, and add about 1/4C of oil. Seal the jar with a lid and shake the hell out of it. Open it up, taste it, and adjust the seasoning. You may want to add 1t of honey or a bit of Tapatio (yes, Tapatio) to round it out. 

Assemble Your Salad
Top greens with sliced potatoes, or leave whole if they're smaller. Drizzle with some dressing, and enjoy! Take extra potatoes, greens & dressing to work for a perfectly satisfying lunch that won't weight you down.

(Nutritional Facts for a Yukon Gold Potato)


October 12, 2012

Babushka's Apricot Bow Ties

Some of the simplest cookies to make may also be the first ones I tasted as a little Russian rug rat. My grandmother always had these "бантики" for us, and taught me to make them. She's getting on in years, so once in a while I surprise her with a batch, making her eyes light up as they did over 30 years ago when she began to share them with me. 

This dough contains only 3 ingredients: butter, cream cheese, and flour, yet it creates a puffy, crisp, tender cookie that's a perfect nest for your favorite jam. I prefer apricot. The organic brand Cascadian Farms makes the best apricot jam I've tasted, and ensures these cookies have no refined sugar, just loads of sunny flavor. 

The only challenge for the less-experienced baker would be cutting even squares from the dough. Using a ruler, a pizza cutter, and following my step-by-step photos, your cookies should look as sharp as mine. 

Make the Dough a Few Hours Ahead (or the Night Before)
4 ounces cream cheese (not whipped - use the old school box)
4 ounces (1 stick) softened butter (if you use salted, don't add salt later)
1 1/4 cups flour (+ more for rolling) 

Your butter and cream cheese should be softened, but not warm or greasy. Cream them together in a bowl using a wooden spoon or a mixer. Stir in the flour until just combined. If using unsalted butter, add a pinch of salt to the flour. Scrape the dough into 2 portions onto sheets of plastic wrap, flatten into an even squarish shape, wrap tightly, and chill for at least 1 hour. 
Rolling with the Homies...
2 sheet pans lined with parchment
a ruler or tape measure
a pizza cutter or sharp knife
a rolling pin
jam & a spoon
1 beaten egg for eggwash & a pastry brush (you can also use your finger)
When the dough is firm & cold, roll out one disc on a floured counter or rolling surface (you can use a large cutting board - something you can cut the dough on without damage). If you don't have a rolling pin, use a large glass bottle or jar. Use sure, even pressure to roll the dough out from the center toward the corners to keep the square shape as much as possible. Once the dough is about 1/8" thick, get out your ruler or tape measure and trim the edges of the dough to create straight edges. 
Cut the dough into 2" squares using a pizza cutter, using a ruler as your guide. Press scraps into a flat disk & store in the fridge for later. Spoon a small amount of jam onto the center of each square. Fold one corner into the center, dab with the beaten egg, and then bring the opposite corner into the center and pinch firmly together to seal the corners. With a thin spatula, transfer the cookie to the cookie sheet. Repeat the process with the remaining dough.

Bake at 400' for about 10-12 minutes, or until the edges are golden. Transfer to a cooling rack. Once almost cool, sprinkle with sifted powdered sugar and serve immediately. Store extras in an airtight container for about a week. 

August 17, 2012

It's Summer. Chimi Some Steak!


Simple, balanced flavors of lemon, garlic, chilies, vinegar, and fresh herbs are all you need to make an irresistible marinade & sauce for steaks, poultry, fish, or vegetables. 

Baja steaks from our own local United Markets are a great value at under $6/pound. Tender cuts averaging under a pound each, these are ideal for dinner parties small or large. Although they have little fat, they are tender as a filet, without the crazy price. 

Chimichurri

4 cloves garlic 
1t kosher salt; more as needed 
1 bunch flat-leaf parsley, stemmed and chopped (about 1-1/2 cups, lightly packed) 
1t dried oregano 
1 small carrot, finely grated 
1/2t freshly ground black pepper 
1/2t dried red chile flakes 
1/2t grated lemon zest 
5T white-wine vinegar or distilled white vinegar; more to taste 
5T cold water; more as needed 
1C extra-virgin olive oil  (use less if you prefer)

Finely chop the garlic on a cutting board. Sprinkle the salt over it and repeatedly scrape the flat side of the knife over the garlic to mash it to a paste. Scrape the garlic paste into a medium bowl. Add the parsley, oregano, carrot, pepper, chile flakes, and lemon zest and mix. Add the vinegar and water and mix again. Whisk in the oil. Taste and correct the seasonings, adding salt, vinegar, water, or chile flakes: the sauce should be highly seasoned.

Place the steaks in a dish, and liberally coat with some of the chimichurri, reserving the rest for after grilling. Marinade for at least 1 hour, or overnight. Flank steak or skirt steak are also ideal choices for this treatment. 

Grill steaks over coals to preferred doneness. Baja steaks are ideally cooked medium-rare since they have little fat. Remove steaks from the grill, coat with more chimichurri, and let rest loosely tented with foil for 5-10 minutes before slicing. 

Excellent with summer squash, potatoes, atop a salad, or as the showstopper in your quesadillas or tacos. 

Store leftover steak in your belly. 


Recipe courtesy of Fine Cooking Magazine

August 10, 2012

Oh, dark mother of all that is caramel...

Tonight, the secret's out. Tonight you will make the best caramel sauce you've ever tasted. 

The secret? Brown sugar. How come you taste so good?

Since this process is more technique than skill, I'll start with the photos, and add the recipe and instructions below. 
Dissolve the sugar in the water. Using a low flame will speed up the process. 
Are we there yet, Papa Smurf? It's getting really dark, and I'm scared. Don't worry. Just keep swirling, and be patient. Waiting for 280' is absolutely necessary. The sugar needs to get hard enough so that it sets into a thick, rich consistency. It will be worth it. 

The good news? Brown sugar contains molasses, which prevents the caramel from crystallizing. It also imparts a butterscotch flavor, which makes the caramel irresistible. 
Almost there...get ready to rumble.
 Using a sharp knife, split the vanilla bean in half lengthwise. Flip the blade, and use the back of the knife to carefully scrape out the seeds. Hold onto the end of the bean tightly. Push down, and move the blade with slow confidence. 
Don't forget the butter & salt! 
(those are vanilla seeds on the butter...)
 Stir the cream in carefully. The colder the cream, the more it will boil up as the water evaporates. 
Using a jarring funnel will help keep the rims of your jars clean. 


RECIPE

2C light brown sugar (the trader joe's organic is rad)
3/4C water
1/2 a vanilla bean, scraped of its seeds
1 1/2C heavy cream
1/2 stick of butter
1/2-1 teaspoon kosher salt (to taste)

Before we start, I am warning you to be extremely careful when cooking sugar.  The best way to avoid injury, is to read through the recipe a couple of times, and get all your ingredients out & measured before you begin. Keep a pair of thick oven mitts (preferably with grip), or Ove' Gloves (Kevlar) handy. 

Careful.

You will see this word many times below. I mean it.

Use a large, heavy pot (4Qt Le Creuset or stainless steel with a reinforced bottom). Make sure the pot is beyond clean, with no burn spots. This caramel will become insanely hot, and will take whatever's stuck to your pot with it. 

Dissolve the sugar in the water. Use a heat-resistant silicone spatula. A quality one should not melt. If your sugar is coarse or has lumps, use a low flame under the pot, and keep stirring to dissolve the sugar. Once it's there, turn the heat up to medium-high, and clip on a candy thermometer. Add the scraped out vanilla pod, but reserve the seeds for later.

The temperature will quickly climb to about 220', then will take about another 10 minutes or so to reach 280'. You must let the sugar get to this stage in order for your caramel to set to the gooey consistency you desire. 

As the sugar boils, it may initially bubble-up violently. This is why you need the too-big pot. Occasionally lift the pot off the fire (using oven mitts), and carefully swirl the mixture to even out hot spots and avoid burning. 

Once the temperature climbs to 280', turn the heat off, and carefully remove the thermometer. Best to put it into a container full of water, or it will stick to whatever it touches. 

Carefully pour in the cream. It can spatter and boil up if the cream is very cold, so stand back. Once it's calmed down, turn the heat back on, and carefully stir the mixture with your silicone spatula. Initially the caramel it harden and clump up, but after a few minutes of stirring, it will dissolve back into a liquid state. Keep stirring until all the clumps are dissolved. 

Turn the heat off. Stir in the seeds from the vanilla bean, the salt, and the butter. Stir until the butter is melted and incorporated. The caramel will look impossibly runny, but it will set & thicken as it cools.

Place a jarring funnel over your clean jars, and carefully fill them.


Let the caramel cool to room temperature before adding lids and refrigerating. 

Store refrigerated for up to a month, or freeze for up to 6 months. 

Makes just under 3 cups. 


June 14, 2012

Adam & Eve on a Raft...Psych!


Light & crisp cornmeal pastry. Vanilla bean custard. And the star? A warm, tender, perfectly ripe apricot. I ate my first apricots of the season today, and my thoughts went straight to this utterly addictive treat. Make your dough and pastry cream the day before to save time in the morning. Then just roll your dough, top with pastry cream and apricots, and bake! 

The Dough

1 1/2 cups flour
6T corn meal
1/2t salt
2t sugar, + extra for baking
5T sour cream
7T water
10 1/2T butter, chilled (1 stick + 2 1/2T)
eggwash (1 egg, lightly beaten with a bit of water)

Mix the dry ingredients (1st 4) together in a bowl. Combine the water & sour cream in a bowl, and set aside. Cut the chilled butter into small cubes, and cut into the dry mixture using a pastry cutter, a fork, or quick pulses in a Cuisinart. Slowly mix in the wet ingredients until a dough is formed. You may not need to use all of it. Doughs will form differently depending on the amount of humidity in the air. Wrap the dough in plastic, and chill for at least 2 hours, or overnight. 


The Pastry Cream

3 yolks
1/3 cup sugar
2T corn starch
1 cup + milk
vanilla bean

Split a vanilla bean, scrap out the seeds. Put the seeds in the sugar, and the pod in your milk. Heat a little more than 1 cup of milk until just scalded. Whisk together the yolks, sugar, and cornstarch. Stabilize your bowl of yolks with a towel or rubber mat. Whisk in the hot milk VERY quickly (or you'll get scrambled eggs). Remove the vanilla pod, and pour the mixture back into the pot from the milk. Stir over medium heat until thick. It will thicken very quickly because of the cornstarch, so whisk constantly, and don't walk away. As soon as it starts to thicken (you can see the lines the whisk leaves), turn off the heat and pour the custard into a clean bowl. It will continue to thicken as you  pour it out, so work quickly, using a spatula to get it all out. Let it cool at room temperature for about an hour, then cover with plastic and chill until set. 

Ready to Roll?

Preheat your oven to 400'. Wash & dry 4 perfectly ripe apricots, and slice them in half lengthwise. Cut the dough into 4 equal pieces. Keep the reserved dough covered and chilled as you roll. Roll each piece of dough into an oval, about 1/8" thick. Spread some pastry cream onto each oval, keeping the edge clear about 1/2" for crimping. Create a border for each tart by folding in the dough onto itself, all the way around. Using a thin spatula, place each tart onto a baking sheet lined with parchment. Brush the crimped edge of each tart with the eggwash. Place 2 half apricots onto each tart (so it looks like 2 fried eggs). Sprinkle some of the extra sugar around the edge of the tart (over the eggwash). 

Bake at 400' until the pastry is golden on the edges and the bottom. Allow to cool on a wire rack for at least 20 minutes before serving. 

Bring these to an outdoor concert, a picnic or brunch, and your friends will forever sing your praises. Hurry up, before apricot season is gone!